When a user login to Canvas App, a landing screen is displayed by default. But if we want to navigate user to a specific screen to follow up on an event, here deep linking feature come into play.
After the introduction of App.StartScreen feature, the deep linking syntax has slightly changed in Canvas apps. In this blog, I have explained how to send user to a particular screen using push notification and deep linking concept.
Create a simple Canvas app: Task Management
In this post, I create a simple “TaskManagement” canvas application. By default, the application shows a tasks list (as a home screen). The requirement is that when a user is assigned a task, the assignee will recieve notification and by clicking on the notification the user will be directed to the assigned task screen.
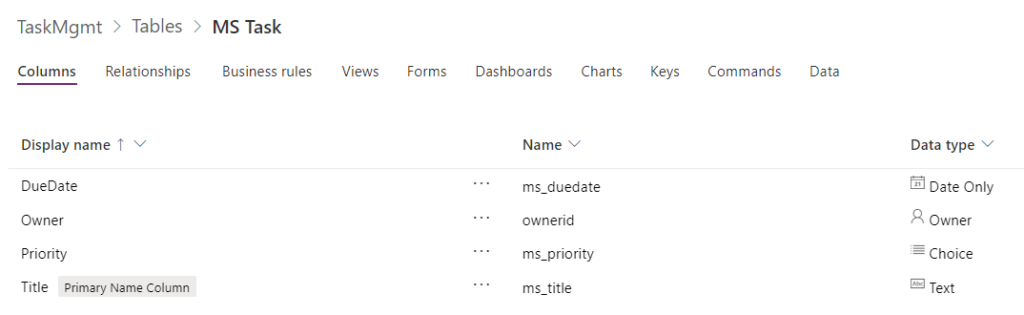
Step 1: Create “MS Task” table in Dataverse
For this demo, I have used dataverse as backend, but other data sources eg SharePoint, SQL Server can also be used.
Tasks Table:
For this demo, I have created a new Tasks table “MS Tasks” (instead of using OOB Tasks table in Dataverse) with following columns:
- Title (Text field) – I have renamed priamry key “Name” column to “Title”
- Priority (Choice) – Custom column with choices “Urgent”, “Normal”, “Low”
- DueDate (DateTime) – Custom Column
- Owner – out of box owner field
Step 2: Create a canvas app
Create a new canvas app using Phone format. Save the application as “TaskManagementApp”. Add data source connections to tables “MS Tasks” and “Users” from Dataverse to the app:
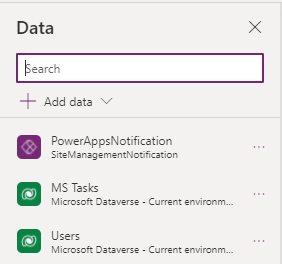
Configuration of “PowerAppsNotification” connector is explain in later steps.
On App Start:
Set the “OnStart” property of the application to below code to get value from parameter “TaskId”. The “TaskId” parameter will contain the GUID of task. Using value from “TaskId” retrieve the task record and store it in a global variable “varTask”:
Set(
    varTask,
    LookUp(
        'MS Tasks',
        'MS Task' = GUID(Param("TaskId"))
    )
);
Based on the parameter (TaskId), we will navigate user to respective screen.
Create Screens
Add two screens:
- Tasks List “ScreenTasksList”
- New / Edit Task “ScreenNewEditTask”
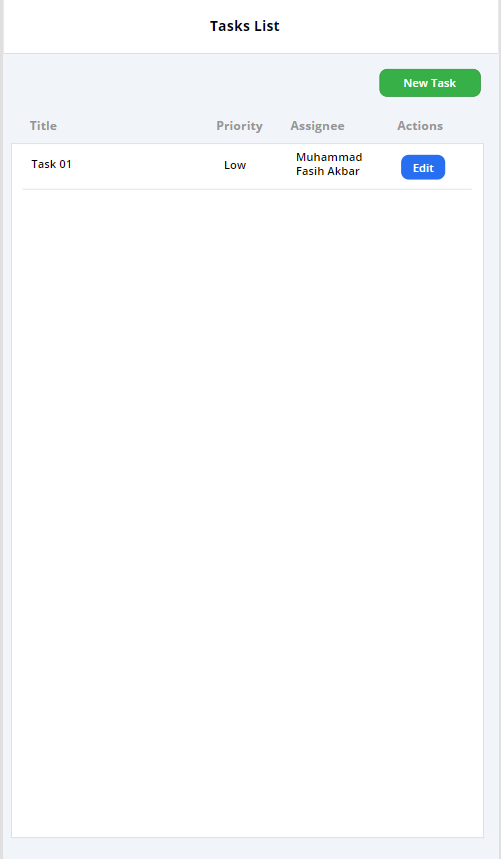
Setup a Tasks List Screen
To refresh the ‘MS Tasks’ data source, set “OnVisible” property of the screen:
Refresh('MS Tasks')Add a vertical (Flexible Height) gallery “galTasksList” on the screen. Set the gallery property “Data Source” (on Properties tab) to ‘MS Tasks’ and add following controls to gallery:
- Label “lblTitleTaskList” and set “Text” property to
ThisItem.Title - Label “lblPriorityTaskList” and set “Text” property to
ThisItem.Priority - Label “lblAssigneeTaskList” and set “Text” property to:
If(IsType(ThisItem.Owner, Users), AsType(ThisItem.Owner, Users).'Full Name') - Button “Edit” and set “OnSelect” property to:
Select(Parent);
Set(varTask, ThisItem);
Navigate(ScreenNewEditTask,ScreenTransition.UnCoverRight)
The selected record (task) is set in a variable “varTask”, so that when the “New / Edit Task” (ScreenNewEditTask) screen is loaded, it will load the task information from the variable for update.
Add labels “Title”, “Priority”, “Assignee”, and “Actions” for gallery headings.
Add button “New Task” (btnNewTaskTasksList) on the screen and set “OnSelect” property:
Set(
    varTask,
    Blank()
);
Navigate(
    ScreenNewEditTask,
    ScreenTransition.UnCoverRight
)
The button sets blank value in the “varTask”, when the “New / Edit Task” (ScreenNewEditTask) screen is loaded, then controls will not load any task information (i.e to create a new task).
After setting up the screen will look like:
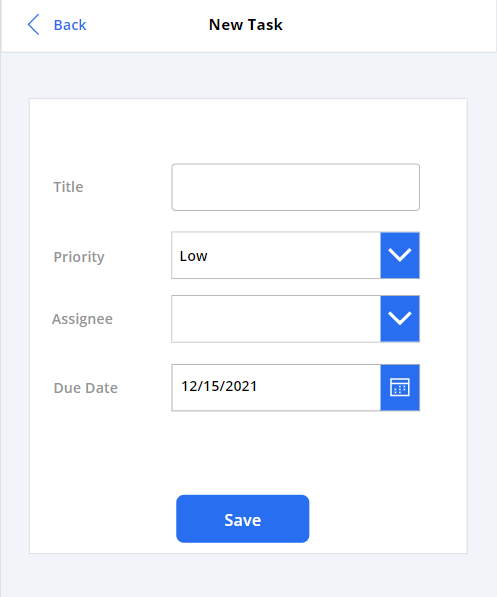
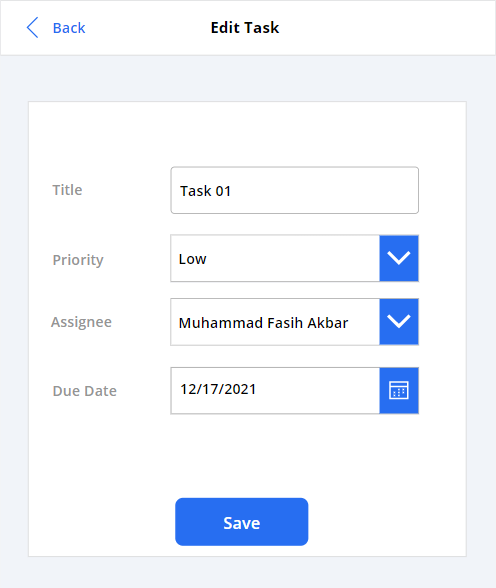
Setup New / Edit Task “ScreenNewEditTask” Screen
Add following controls to the screen:
- Label “Title” – label for Title field
- Textbox (txtTitleTask) – Textbox for Title column
- Label “Priority” – Label for Priority
- Dropdown (dpdPriorityTask) – dropdown for Priority field.
- Label “Assignee” – Label for Assignee field
- Dropdown (dpdAssigneeTask) – dropdown for task Assignee
- Label “Due Date” – Label for due date field
- Date Picker (dtpDueDate) – control for due date
- Button “Save” – To save or update task
- Button “Back” – Navigate user to Tasks List screen
Reset all input controls in “OnVisible” property of screen:
OnVisible:
Concurrent(
    Reset(txtTitleTask),
    Reset(dpdPriorityTask),
    Reset(dpdAssigneeTask),
    Reset(dtpDueDate)
);
To use the same screen for new task and edit (an existing) task, I’m using “varTask” variable. The “varTask” is a global variable and it stores the task record which has to be updated. If “varTask” is blank then a new task is created, otherwise load details (data) of task from “varTask” record.
Set properties for textbox Title (txtTitleTask):
Default = varTask.Title
Set properties for dropdown Priority (dpdPriorityTask):
Default: If(!IsBlank(varTask), varTask.Priority, 'Priority (MS Tasks)'.Low)
Items: Choices('MS Tasks'.Priority)
Set properties for dropdown Assignee (dpdAssigneeTask):
Default: If(IsType(varTask.Owner, Users), AsType(varTask.Owner, Users).'Full Name')
Items: Filter(Users, 'User Licensed' = 'User Licensed (Users)'.Yes)
Set properties for date picker Due Date (dtpDueDateTask):
DefaultDate: If(IsBlank(varTask.DueDate), Today(), varTask.DueDate)
Back button:
Select “OnSelect” property of the back button add code:
Navigate(ScreenTasksList)Save button:
Select “OnSelect” property of the “Save” button add the code:
ClearCollect(
    TasksOp,
    If(
        IsBlank(varTask),
    //Create new Task
        Patch(
            'MS Tasks',
            Defaults('MS Tasks'),
            {
                Title: txtTitleTask.Text,
                Priority: dpdPriorityTask.Selected.Value,
                Owner: dpdAssigneeTask.Selected,
                DueDate: dtpDueDateTask.SelectedDate
            }
        ),
    //Update task
        Patch(
            'MS Tasks',
            varTask,
            {
                Title: txtTitleTask.Text,
                Priority: dpdPriorityTask.Selected.Value,
                Owner: dpdAssigneeTask.Selected,
                DueDate: dtpDueDateTask.SelectedDate
            }
        )
    )
);
On click of the “Save” button, if an existing task record is loaded on a screen, then it will be updated, otherwise a new task record will be created. However, in both cases “TasksOp” will contain the record(s).
Using the “ScreenNewEditTask” Screen, a user can create new task and assign to a user or update an existing task and assign it to another user.
If user clicks on “New Task” button (on Tasks List screen), the screen will be displayed as:
The Edit Task screen display:
Send Push Notification to Assignee (user)
When a task is saved (create / update), the assignee will receive push notification on mobile. On click of the notification the user will visit the edit task screen to check and modify the assigned task.
The steps describes how to achieve the functionality:
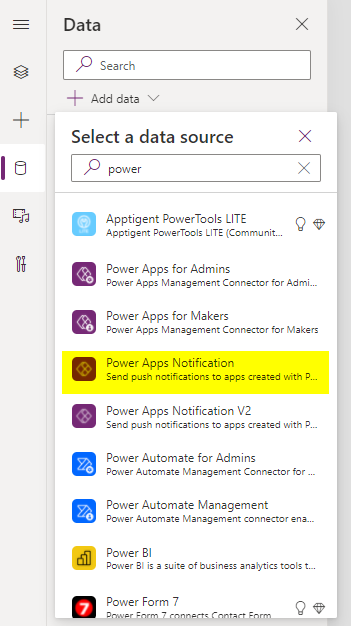
Add “Power Apps Notification” Connector
Add a power apps notification connector by clicking on “Data” and then selecting “Power Apps Notification” connector:
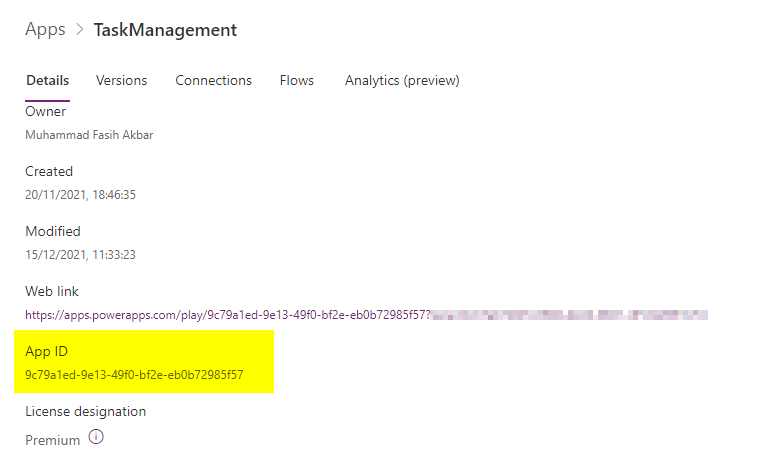
In the next step, add the Application (TaskManagement) Id in the Target Application and click connect:

The push notification will open the application for which the id is set in “Target Application” in the connector.
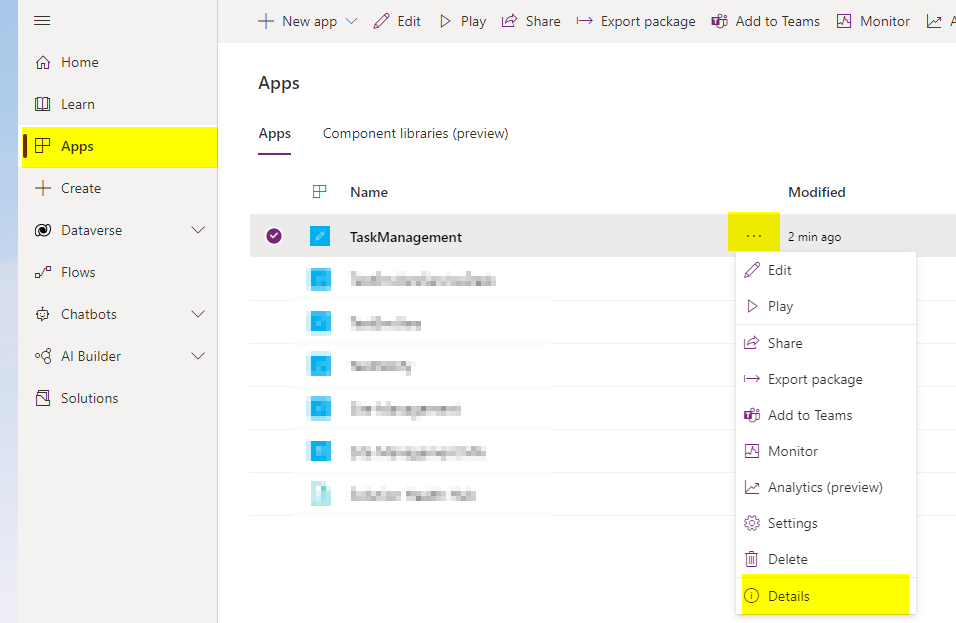
Note: To get the application Id, go to Apps (in a Dataverse environment) and then click on the three dots (…) against the application and click on details:
Update “Save” button code to Send Notification
Modify the Save button “OnSelect” property to add a code to send push notification using “Power Apps Notification” connector:
PowerAppsNotification.SendPushNotification(
    {
        recipients:[dpdAssigneeTask.Selected.'Primary Email'],
        message:"New Task Assigned",
        openApp:true,
        params:Table({key:"TaskId", value: First(TasksOp).'MS Task'})
    }
);
The code is explained as:
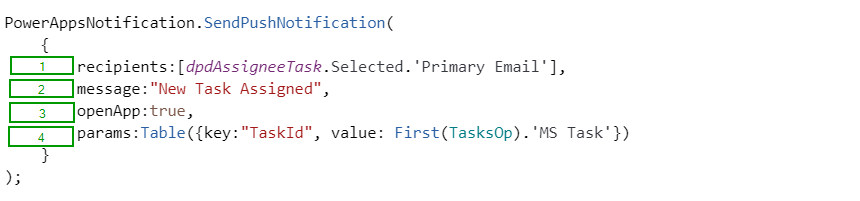
1 – In first parameter “recipients” are set by passing the email address(es) of user(s).
Only one recipient “Assignee” of task will recieve the notification.
2 – In 2nd parameter “message”, set the message that user will see in the notification on mobile (or tablet).
3 – If the parameter “openApp” is set to true, then click of notification, the power app will open up, otherwise no.
4 – All the parameters will be passed in “params” in key/value pair format.
Complete code for “OnSelect” property of the “Save” button:
ClearCollect(
    TasksOp,
    If(
        IsBlank(varTask),
    //Create new Task
        Patch(
            'MS Tasks',
            Defaults('MS Tasks'),
            {
                Title: txtTitleTask.Text,
                Priority: dpdPriorityTask.Selected.Value,
                Owner: dpdAssigneeTask.Selected,
                DueDate: dtpDueDateTask.SelectedDate
            }
        ),
    //Update task
        Patch(
            'MS Tasks',
            varTask,
            {
                Title: txtTitleTask.Text,
                Priority: dpdPriorityTask.Selected.Value,
                Owner: dpdAssigneeTask.Selected,
                DueDate: dtpDueDateTask.SelectedDate
            }
        )
    )
);

PowerAppsNotification.SendPushNotification(
    {
        recipients:[dpdAssigneeTask.Selected.'Primary Email'],
        message:"New Task Assigned",
        openApp:true,
        params:Table({key:"TaskId", value: First(TasksOp).'MS Task'})
    }
);
I have passed only one parameter where key is TaskId and value is the GUID of the task created / modified.
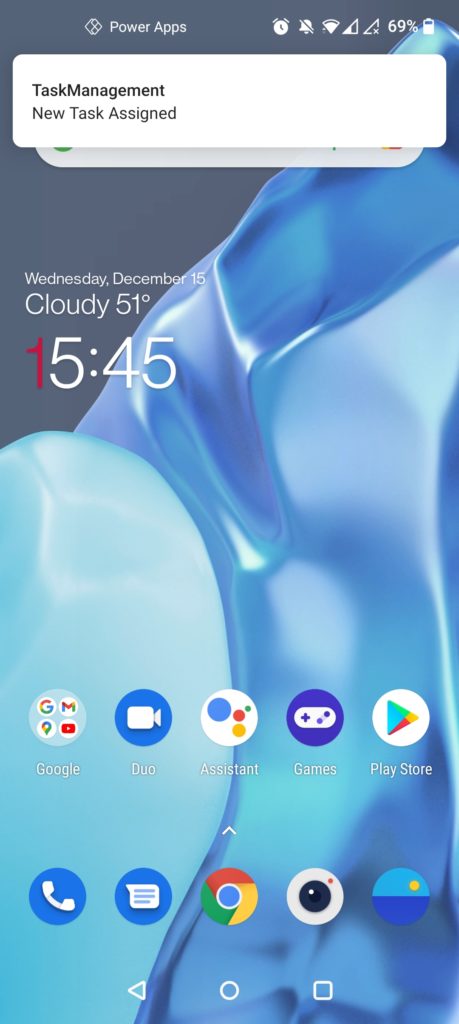
The notification received is clickable and open the canvas app but the user is not navigated to “Edit” task screen to load the specific task. It is because we have not set the Start Screen.
Set the “Start Screen”
To set the start screen according to the parameter status, add code to the “StartScreen” property of “App”:
If(
    IsBlank(Param("TaskId")),
    ScreenTasksList,
    ScreenNewEditTask
)
The code sets the start screen to “ScreenTasksList” if the “TaskId” parameter is blank, otherwise screen “ScreenNewEditTask” will be displayed.
Previously, we used Navigate() function in App.OnStart to direct user to a specific screen. This option (of using Navigate function in App.OnStart) is retired. For more information on App.StartScreen visit here.
Now when notification is clicked, the user will be navigated to “Edit Task” screen.
Do not forget to save and publish the app 🙂 and try it out on mobile.
If you have any queries and suggestions, please share in comments.
References
Microsoft Documentation:
https://docs.microsoft.com/en-us/powerapps/maker/canvas-apps/add-notifications
Video by Reza
https://www.youtube.com/watch?v=YLYsognPA6s